Showing posts with label Other Foods. Show all posts

Sunday, October 31, 2010

Cranberry & Milk Chocolate Gluten and Milk Free Scones.


I tried a different scone recipe this mornings.  I used cranberries again, but this time I used one of the rice milk milk chocolate bars.  I like this recipe much better.  I did something different though - instead of making small round scones, I made 2 huge circles that broke apart to 4 each.

Here is the pic for now - check back later today or tomorrow for the recipe.

Gluten Free Peanut Butter Kiss cookies.


Perhaps the easiest cookies ever to make, well - except when you live in Germany and don't have access to Hersey's kisses :-P   Luckily, I was able to get a bag so made some of these.

Recipe is sssssoooooooooooo   simple.   Equal parts of peanut butter and sugar and add egg (1-2 depending on how much you make).  The following is what I did this morning.

1 cup peanut butter (I use pure peanut butter (ie, 100% peanuts)
1 cup sugar (can use white, brown - what ever you want)
1 egg
24 Hersey's Kisses (you could also use mini Reese's cups too (again not available in Germany)

Mix the above together. Form balls using your hands and bake for 10 minutes at 180°C.  As soon as you remove them, put a Hersey's kiss (unwrapped of course) into the center and push it down a bit.

Easy peasy!!!


Tuesday, October 26, 2010

Gluten and Dairy Free Pierogies

Adding the enlarged photo of the finished product to get a better look at it.

MaMa With Flavor  and I make Gluten and Dairy Free Pierogies when I went to visit her and her family.  Neither of us had made them from scratch before, we had only had frozen ones.  We were very impressed with how easy they were to make and how tasty they were.  Even her little Ninja baby (1 year old) ate them up :)Pictures provided by MaMa With Flavor

Gluten-Free Pierogi Recipe
Adapted from Lauren of Celiac Teen with what we had on hand and using Teff instead of Brown Rice (which is not available here in Germany) and making it dairy free.

Ingredients (makes about 36 to 40)
1 cup Corn Starch
1 cup Sweet Rice Flour
1/2 cup Millet Flour
1/2 cup Teff Flour
1 tablespoon Xanthan Gum
1 teaspoon Salt
1/2 cup Soy Milk
1/2 cup Soy Cooking Cream
3 Egg Whites

Sift together dry ingredients in a large bowl. Mix together wet ingredients and then stir in to the dry ingredients.  We used a kitchen aid with the mixing paddle for this entire process- worked perfectly.  Then switch to the kneading paddle and let the kitchen aid knead the dough (for kneading by hand - Lauren has a great step by step on her Celiac Teen blog where we got the recipe

Cut off 1/4 of the ball and place the rest in your bowl, with a damp paper towel over-top to keep it moist.  Roll out the dough until it is quite thin (a few millimeters tall) (you may or may not need extra flour for this step - ours were fine without using flour to roll it out), cut circles - we used a glass for this.

Using your hands - form little balls with the filling (see what we used below) and place in the center of the pierogi circle.  Fold the circles over and pinch edges together and press with a fork to make them look nice :)

Repeat using the other quarters of dough.

To cook, bring water to a boil. Salt as desired. Cook pierogi in the boiling water for five minutes (they will float to the top when done).

Our added tip - once these have cooled/dried after being boiled - saute them in a pan of dairy free margarine (you can add herbs, onions - what ever you want for flavor) for a few minutes on each side - this adds to the taste/flavor/texture.  Also, we melted some dairy free margarine with herbs and used to drizzle over them.

Our filling
Boiled potatoes
Bacon cooked and crumbles up (Sommer's GREAT idea :-)
Scallions (green part chopped up - white if you want as well) and sauteed in margarine
Bit of soy milk if needed
Pecorino Romano Cheese grated
Fresh Garlic to taste
Salt/Pepper to taste

Mash the above together. You want a rough mash (you need to be able to form little balls with your hands - so  only use the soy milk if needed.
HUGE thank you to MaMa With  Flavor for the wonderful couple days and loads of cooking/food talk and girl chat ;-) and also to Lauren of Celiac Teen for the recipe!

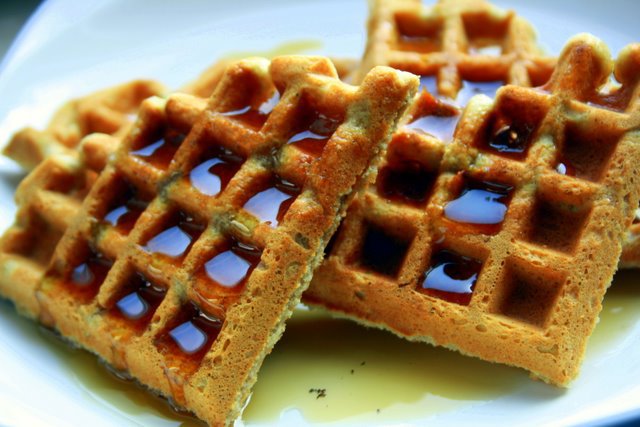
Gluten & Dairy Free Waffles made with the help of a princess...

Again - photo provided by MaMa with flavor :)

While I was visiting MaMa With Flavor her 3 year old helped to make some gluten and dairy free waffles for breakfast.  We used a kitchen aid (now I want one of those too ;-) to mix from start to finish, but you can use a normal hand mixer.

6 Eggs (separated)
1/4 teaspoon Cream of Tartar
3 cups Gluten Free Flour (we used Bob's Red Mill - Almond flour)
1/2 teaspoon Salt
1/2 teaspoon Baking Soda
2 tablespoon Soy Milk
1 tablespoon Vanilla 
4 tablespoons Dairy Free Margarine

In a large bowl, combine flour, salt and baking soda and sift together.
In small bowl - mix together the egg yolks, margarine, soy milk and vanilla.  Then add these to the dry ingredients and mix until smooth.

In a separate bowl - beat the egg whites and cream of tartar until stiff.  Once stiff - add by hand to the batter using a wooden spoon until mixed together.

Heat waffle iron and coat with non-stick spray if it is not non-stick.  Pour about 1/2 cup on batter into your iron (depending on size) and bake until done.

Enjoy with pure maple syrup.

Saturday, October 9, 2010

Balsamic Chicken with White Wine/Pecorino Risotto. Gluten and Milk Free

Very last minute throw together of what was in the fridge - turned out great.
I just wish we had a nice camera to take better pictures, but the point and shoot digital will have to do :)

For the Balsamic Chicken
What you will need:
2 chicken breast
1/4 cups Balsamic Vinegar
Vegetables of your choice (I used red, green, yellow peppers and cherry tomatoes)
Spices of your choice (I used oregano, rosemary, salt, ground fresh pepper, red pepper flakes)
Olive oil

Directions:
I the chicken breast in a shallow baking dish and the vegetables sliced/diced - however you prefer them. Pour  Balsamic Vinegar over everything.  Add the oil and spices.  Bake for 20 min or more depending on thickness of chicken breast.

At the same time, prepare the Risotto

For the White Wine/Pecorino Risotto
What you will need:
200g Risotto(I used Arborio)
finely diced onion
olive  oil
bit of margarine
1/2 cup white wine
.75l chicken stock
1/2 cup or so peas (I added these as a last thought as wanted color in the rice)
100g Pecorino cheese

Directions:
Brown the onions in the olive oil. Add the margarine and when melted - add the rice.  Mix around so rice is coated and cook for a few min (2-3).  Then add the white wine.  Cook for 2-3 more min or until the wine is absorbed.  Then add .25l of the chicken stock.  When most is absorbed, add .25l more.  A few min later, add the remaining .25l.  Cook while stirring quite often for 12-15 min uncovered. Add the peas a few min before time is up - enough to cook them through. Add the Pecorino and stir until melted.

Friday, October 8, 2010

Cranberry & White Chocolate Gluten and Milk Free Scones.

First let me say, these are not the true "British" scones.  I decided it was too painful to eat a plain scone without being able to have the clotted cream (soy cream was just not going to cut it). So, I decided to try something with cranberries and margarine.   While shopping at my local Basic Bio Shop I was waiting in the long check out line and of course - this is where they put the chocolate.  One of the brands Bonvita caught my eye - It was made with Rice Milk.  So, I decided to grab a bar - I chose white as think it goes quite well with  cranberries :-)

I searched and searched to find some recipe that would work but did not like any of  them. They either had too much sugar, rice flour, milk etc.. and I really did not want to use soy in this recipe (which was actually my originally idea until I found the goat's yogurt).  So, I literally took 4 different recipes (some GF, some not) and combined what I  liked about each one.  They were all very different in the amounts of items they used.  They are not the award winning scones my friend Andrea baked ;-) but they definitely won the award of  best baked product on a first time experiment (ok, well, ties with my cornbread - but  I never wrote that recipe down :( 

The only thing I do not like about these, is they are dark in color (so may not look like your traditional scone). This is because all of the flours used were darker in color than the typical rice flours which most recipes called for. I would rather have the better taste & texture than better color - but that is just me.  They also did not raise as much as I had hoped.  I found recipes using anywhere from 2 to 6 teaspoons of baking powder (for relatively same weight of flour) - so I went with 4. I think I would perhaps use the 6 next time, or even add 1 teaspoon of soda - we will see.

So, here is the recipe I put together.

Cranberry White Chocolate – Gluten and Milk Free

Ingredients:
•    60g Millet Flour
•    60g Quinoa Flour
•    80g Teff Flour
•    40g Tapioca Flour
•    4 tsp Baking Powder
•    2 tsp Xanthan Gum
•    1tsp Salt
•    50g Sugar
•    115g Milk Free Margarine (I used Sanella)
•    1/2 cup Dried Cranberries
•    100g White Chocolate cut into pieces (I used Bonvita Rice Milk White Chocolate)
•    2 Medium Eggs
•    125g Goat’s Yogurt (I used Andechser Bio-Ziegenjogurt mild)
•    1 Egg (for the egg wash)
•    1/2 teaspoon Vanilla
Raw Brown Sugar to sprinkle on top

Directions:
1.    Preheat the oven to 240°C.
2.    Sift the flours and remaining dry ingredients into a bowl.  Now shift them again. And one more time (I always shift the dry ingredients at least 3 times, especially when working with Quiona as there are sometimes small seeds still in the flour).
3.    With your hands – work the butter into the dry ingredients.
4.    Add the cranberries and the white chocolate and gently mix together with a wooden spoon.
5.    Whisk the 2 eggs, Vanilla and Goat’s yogurt together in a small bowl.
6.    Add the liquid mixture to the dry ingredients using a wooden spoon. The consistency is a wet, yet not too sticky.  You may have to play with adding more yogurt or flour. This can also depend on the size of the eggs used.
7.    Turn onto a gluten free floured board gently knead the dough together (2-3 times maximum) and then flatten with your hands to about 3cm thick.  Use a round biscuit cutter or anything really (I used a Guinness pint glass :-)  and cut out your scones making sure not to turn the cutter – you want one straight cut (this helps them to raise).
8.    Place on baking sheet lined with baking liner and brush with the egg wash and sprinkle the brown sugar on top.
9.    Bake for 15 minutes.  You may need to bake a couple min less or more.  Check on them every 2 minutes after the 12-15 until they are nice and brown.
10.    Enjoy warm.  You can put margarine or jam on them – but with the cranberries and white chocolate – they are delicious all by themselves.


What I Did Right:
I used a combination of 4 flours this time, not sure why, just decided to - but it worked in the end.  I really am in shock of how wonderful these turned out. I wish  I had a picture of my face when I took them out of the oven. Really, they ARE that good!!!


What I Would Do Different:
I would use more teaspoon of baking powder, perhaps even some baking soda. I would also perhaps try it using soy yogurt - just to see how the taste would be different.


Monday, October 4, 2010

Chicken, Avocado, Bacon, Red Pepper & Cheese Panini - Gluten & Milk Free

OK, very sorry, but no picture of this one. We ate them too fast :)  But believe me, they were yummy and looked great too.  The brilliant thing about doing something like this, is that you do not need a recipe.  You can usually use what you have no hand as long as you think the taste will go together.  I got the idea to do panini from MamaWithFlavor after seeing her wonderful last post on her Autumn Sandwich.

We had a very, er, hard, day yesterday at the Oktoberfest ;-) so have not even left our pajamas today :) So, we just used what was in the fridge.  Here is what I did.

Makes 2 paninis
4 slices of Gluten/Milk Free Bread
2 grilled Red Peppers (used ones from a jar as had them on hand)
thinly sliced Pecorino Cheese 
Diced/cubed Bacon (you could also use slices, but hard to find here)
1 ripe Avocado - sliced lengthwise
Mayonnaise (gluten/milk free of course)
2 chicken breast
oil
cumin
coriander
Salt and Pepper
I marinated the chicken in the oil, cumin, coriander, salt and pepper- then grilled it on the George Foreman Grill then sat it aside. At the same time, I cooked the bacon dices/cubes.

Next I re-grilled the red peppers (to heat them and bring out the grilled flavor)

Spread the mayonnaise on each piece of bread.

Then I put onto each of 2 of the sliced bread (order is not important)
-chicken breast
-cheese
-grilled pepper
-avocado
-bacon
Top this with the other slices of bread with mayonnaise.

Then I put these on the grill closing the  lid by pressing it down to flatten them as much as possible.

After a few minutes, we had the most awesome paninis ever!

So, when you don't feel like going out and you have a few things in the fridge and some GF bread - just throw something like this together. There are so many wonderful possibilities you could create :)

Saturday, October 2, 2010

Bird's Nest for breakfast....Gluten and Milk Free

I got this idea from Andrea, a friend who made these. She found the recipe from The MrBreakfast.com site.

I used a Gluten/Milk Free bread. Toasted it.  Mixed the egg whites with a bit of salt. Piled onto of the toasted/buttered bread.  Put the egg yolk in the center and baked.  We found these a bit interesting and different from our usual same ol breakfast.  But we also found them a bit bland.  I think next time I made them, I would put some fresh ground pepper on top or some other spice. We both love our spices ;-)

I think if you have kids, these  would be an awesome breakfast treat - as they are different and interesting.  The texture was also quite nice.

Overall, it was a nice change for us for breakfast. Although we each had 2, we were still hungry after ;-)

Thursday, September 30, 2010

Comfort food ... Gluten and Lactose Free Brownies


My neck/shoulders have gone all spasm on me again and spent the night on muscle relaxers and painkillers.  I was in the mood for some comfort food and had given all my cupcakes away.  So, I had a box of Gluten Free Brownies in the pantry that were easy to make as take little mixing (shoulder is too sore to mix).  So, I whipped them up in a hurry and then put the left over turquoise frosting on them.

Ironically for some reason, you can actually see the true color of the frosting in this pic, unlike in the photos from the pot below this one.  I LOVE the brown/turquoise combo together.

They are so yummy :-)   I feel a bit guilty for not making them from scratch, but I usually have a box on hand in case I need them in a hurry and don't have the ingredients to make them myself.

The brand is Bauckhof and they make several other gluten free mixes.  I have had the falafal (quite nice) and the pizza dough (would never buy again).