Am posting this as I tried to post a simple response to the question on the Tuna Noodle Casserole, but for some reason, I can not post a comment. Tried many different things to get the comments to work, and we couldn't. So, I decided the answer was actually worth a blog post anyway :)
The beauty of Ghee (aka clarified butter) is that it is butter and it is casein free! During the process of cooking butter down - it leaves 3 layers. The top layer is skimmed off and the middle layer is the clarified butter (Ghee). This is poured off and kept for cooking and the bottom layer (all the milk solids) is tossed.
Ghee is quite expensive to buy, but easy to make. Below are a few links to making your own. I just don't have the patients, so I buy the local German equivalent - Butaris.
Ghee is an old Indian tradition - and trust me, you use Ghee in your curry instead of butter or oil and you WILL notice the wonderful difference!
For times when you want some butter on your toast or want to bake with butter, I use goat's butter for this. Also quite nice. And added benefit is that it is white, so you can make nice white frosting with it too :)
Here are a few links for making your own clarified butter as well as general info on Ghee
I saw a nice pic of some tuna noodle casserole on some food site the other day and thought, that would be nice to make for a change. However, I wanted to try it from scratch. I searched several major food sites as well as blogs and could not really find a recipe that was totally from scratch. Nearly all of them required a can of condensed soup and as that has both milk and gluten it it - that was out. I found a couple sites with the soup recipe, but didn't really like any of them. So, I decided to make up my own recipe. As I was trying to write down what I wanted, I decided to also use fresh tuna and add some peppers (as we love peppers).
Then while asking my Guy if he preferred the top crunchy or if he preferred peas or no peas - he didn't really know why I was asking. So I ask him "Have you ever had tuna noodle casserole before?" and was shocked when he answered no! So, we decided to do this together as I love cooking with him :)
So, I wrote down what I thought I wanted to do and printed it out - but when we started cooking, the paper sort of got lost as we just kept making it up as we went along. I tried after to remember as close as possible what we had done and get it all down. The only thing that we ended up doing differently than what I wrote below, is that yes, we did cheap :( We made way too much of the veggie/milk sauce and noodles and the 2 tuna steaks were just not quite enough - so, we added some canned tuna - yes I know! But I adjusted the recipe below to call for 4 tuna steaks (we only used 2). You could DEFINITELY tell the different in the bites with the freshly grilled and the canned. Don't think I would ever make tuna noodle casserole again from a can!
Gluten, Milk & Soy Free Tuna Noodle Casserole (Makes 6 large portions or 8 small)
Ingredients:
4 tablespoon Ghee
2 Green Onions, sliced
1 small Shallot, diced
2 celery sticks, diced finely
1/2 each of Yellow, Orange and Red Bell Peppers, diced finely
3-5 cloves Garlic, diced
Course Sea Salt and Mixed Peppercorns ground - to taste
2 cups fresh Mushrooms (sliced)
1 cup frozen Peas
1 cup Goat’s Milk
3 tablespoons Millet Flour
1/2 cup Vegetable Broth
1 box Gluten Free Pasta Spirals, cooked
1/4 cup Gluten Free Bread Crumbs
1 cup Pecorino Cheese
4 fresh Tuna Steaks, grilled
Directions:
1. Melt the Ghee in a large skillet. Then sautéed onion (both types), garlic, celery, all the peppers for 5-7 minutes until soft. Then add the mushrooms and peas and cook another couple minutes.
2. Add the flour to the milk, whisk together and add to the sautéed mixture. Also add the vegetable broth at this time.
3. If you have not already done so, cook the pasta according to directions.
4. If you have not already done so, grill or bake the tuna until cooked. When cooled slightly, fork into bite sized pieces.
5. Mix together in a large baking dish the pasta, most of the cheese (leave some to put on top), the tuna and the sautéed veggie/milk mixture,
6. Top with the remaining cheese and breadcrumbs.
7. Bake at 180°C for 35-40 minutes or until cheese is melted and top is nice and browned.
So, tonight at around 11pm, Guy and I felt like something chocolate (we are watching the movie Chocolate!) Also - today I spent the most lovely day with a friend of mine and her 2 little ones. She baked 2 different cakes for her oldest's birthday party on Sunday. So, since I was in the mood for cake and we were both in the mood for chocolate, I thought I would throw together a quick cake! I searched my flours and realized I was out of Millet (my most used flour). I also realized I have way too much almond flour, so what did I do – I grabbed my Gluten Free Almond Flour Cookbook from Elanas Pantry
I LOVED the photo on the front page. While I have tried to make the frosting that Elana has in her book, I was not successful, so I made the Martha Stewart one I have used before with great success and then toasted it.
After baking the cake and letting it cool (well almost, we were impatient) I frosted it and set my torch to it!
Here is our result – a chocolate gluten free, milk free, soy free cake in less than an hour. We are certainly enjoying our midnight snack of chocolate cake with toasted marshmallow topping along with a nice red wine!!
I don’t really miss bread much. I was never a big bread eater anyway. What I do miss though is Cinnamon Raisin Bread. I could devour an entire loaf in one sitting if I really tried :-) My friend Ma With Flavor has been posting about baking bread these last couple weeks, which gave me the craving. Then I saw that Kat, a facebook friend of mine, recently started a blog Cup of Sugar Pinch of Salt and I saw she posted a cinnamon raisin bread recipe. Her blog has some majorly delicious food (not specifically gluten free, but all could be adapted I am sure) I decided to try to adapt her recipe to be gluten, milk and soy free.
The only major change I did (other than the flours and milk obviously) was to not do the rolling out and then swirl effect. I didn’t want to work the dough any more than I needed to – as the gluten free flours don’t rise like wheat flours anyway. So, I just added the cinnamon to the flour mixture and formed the loaf right off (in her recipe, she rolls it out, spreads the cinnamon mixture on the dough and rerolls to form the swirl in the center of the bread). And am I glad I did this, as it didn't really rise much at all :(.
I normally use onlyfresh yeast here in Germany as have never really had luck with the dry stuff. This time around, I used the dry - next time I will stick to the fresh ;-) I also substituted goat's milk for the milk. I also topped it with some lovely goat's butter while sampling a slice.
While it did not rise as it should have, it certainly tasted as it should have. I will never have that light fluffy texture using gluten free flours (this is what the gluten does for bread) - but I am quite content with my goat's milk/butter gluten free bread!!!
Note: This will be much darker than the pic of the one that Kat made in her blog - as I used Teff flour.
1/2 cup Goat’s or Sheep’s Milk
1/3 cup Warm Water (must be between 110-115F degrees)
5 grams Active Dry Yeast
1 Egg
32 grams Castor Sugar
1/3 teaspoon Salt
35 grams Margarine, softened
1 cup Raisins
100 grams Millet Flour
75 grams Teff Flour
75 grams Quinoa Flour
50 grams Potato Flour
1/2 teaspoon Xanthum Gum
2 teaspoons Ground Cinnamon
Directions
1. Warm the milk in a small sauce pan on the stove until it just starts to bubble, stirring occasionally. Remove from heat. Let cool until lukewarm, about 120-125F degrees.
2. Dissolve yeast in warm water and set aside until yeast is frothy, about 10 minutes or so (make sure your water is at the correct temperature or the yeast won’t activate.)
3. Then mix in egg, sugar, margarine, salt and raisins (stir in the cooled milk slowly so you don’t cook the eggs.)
4. Add the cinnamon, then add the flour and gradually to make a stiff dough.
5. Knead the dough on a lightly floured surface for a few minutes until smooth.
6. Form dough into a loaf and place into well greased 9 x 5 inch pans and lightly grease tops of loaves. Let rise in warm place for about 1 ½ hours or until doubled
7. Bake at 350F degrees for 45 minutes or until loaf is lightly browned and sound hollow when tapped.
8. Remove from oven and let cool on rack. Take melted butter and spread over tops of loaf. After about 20 minutes, lay loaf on its sides and remove from pan. Allow to cool before slicing
9. Slather with some goat's butter or margarine and enjoy!
So, I had a large hokkaido pumpkin that a friend gave me from her mother's garden that needed to be used up. I quartered it, de-seeded it and roasted it on Sunday. Today I wanted to try to make something different with it. I did not want to do muffins or bread - really did not want the sugar and Guy is not here to help me eat it, so searched for something healthy. I have made pumpkin soup many times, but the recipe I found on www.foodbuzz.com looked so delicious. I adapted it to what I had on hand and to my taste. The major difference is that I of course used the fresh pumpkin I had just roasted, rather than canned pumpkin. I have not used canned pumpkin for years. Once you use fresh pumpkin - you never go back ;)
The recipe I found was this one from Mistress of spices. I LOVED the fact that she combined pumpkin with Chipotle peppers - 2 of my favorite flavors. The pictures did not turn out that great, but it tasted so wonderful!!!
2 tablespoon Ghee
1 medium Red Onion
5 Cloves Garlic
3 Carrots
½ each Red, Yellow, Orange & Green Bell peppers
1 teaspoon Cumin Seeds
Course Sea Salt & Mixed Pepper Korns – ground fresh - to taste
450 g Fresh Roasted Hokkaido Pumpkin
2 cups Water and a Chicken Bouillon cube
½ of a small can of Chipotle Peppers in Adobo Sauce
Grated Pecorino Cheese to garnish
Homemade tortillas
1. In a food processor – chop onions and garlic finely.
2. In a food processor – shred or thinly slice the carrots and peppers
3. Heat the ghee in a skillet. Add the onion, garlic, carrots, peppers, salt, pepper, cumin seeds. Saute until the vegetables are tender, about 6-8 minutes.
4. Transfer your sauted veggies/spices to a saucepan, add the pumpkin, broth and chipotle peppers. Bring the mixture to a boil and then simmer on low heat to bring out the flavor – about 15-20 min.
5. Puree the mixture with a Stabmixer (or any method of pureeing).
6. Follow the directions on a bag of masa harina corn flour to make your homemade tortillas while your soup is simmering.
7. Top soup with percorino cheese and enjoy with your freshly made tortillas!
Goodness is the only investment that never fails.
~Henry David Thoreau
And I have so much goodness in my life with the investment that is made in our relationship, not everyone is so lucky! Ours is one that is true, honest, loving, trusting and faithful - what more could one asked for! Happy Valentine's Day my dearest Medvidku!! ♥
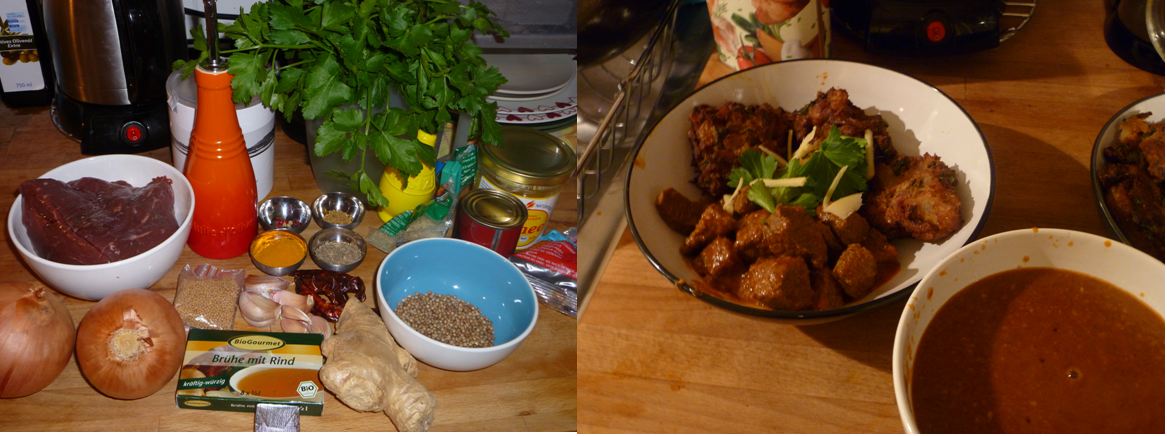
We LOVE LOVE LOVE curry, and the best thing about curry (other than the taste of course) is that it is naturally gluten free!!!
We haven't made curry at home for a few weeks and every time we do, we (ok, I) forget to write down what we did. :) This time, we made sure to write it down as well as take pictures of what we did.
We found some quite affordable nice Argentinian beef at the local supermarket (German beef is usually quite tough, as they raise their cows for milk, not meat), so we bought the only large piece they had left.
When we make curry at home, we normally do not make the rice or bread. I have tried to make gluten free naan bread before, but never with any success. And with Guy being a diabetic, he doesn't need the extra bread anyway - so we just make the curry and onion bhaji, and leave out the rice.
We love cooking together and since he is not working in Munich during the week at the moment, weekends are always so busy, but this weekend, we made the time to prepare a nice meal together - we really have fun doing this. :-)
For the Curry you will need(and please do adjust for your taste, we do)
2 tablespoons whole coriander seeds
1 tablespoon whole cumin seeds
1 teaspoon turmeric powder
1 teaspoon mixed color peppercorns
4-5 dried red chills (I more or less per hotness you desire)
1. The first step is to prepare your curry paste. We use ONLY seeds, never powders (except for the Tumeric). Measure your seeds and place the following into a dry skillet to roast - coriander, cumin, peppercorns, chilies and fenugreek. Roast until you can smell the wonderful flavors coming out, but be careful not to burn the seeds. Then allow to cool (this is important, as if you put them in the grinder while they are still warm, there is too much moisture). Then grind the seeds in a grinder (we have a separate coffee grinder that we use only for curry spices :), and add this ground spice mix to a small food processor. Add the turmeric powder, garlic, ginger, olive oil and lemon juice and mix in the food processor to form a paste. You can add more oil if it is too dry. When it is a nice paste, you are finished with your amazing curry paste (which you can make at any time and use anytime). Set aside.
2. Heat 2 tablespoon of ghee butter (this IS milk Free - so it is worth it to buy a nice jar of Ghee (or even make it yourself if you time)) in a large saucepan over high heat. Add the beef. Cook, stirring for 2 to 3 minutes, or until browned. Transfer to a bowl.
3. Reduce heat to medium. Add spice paste. Cook for 1 minute. Return beef to saucepan. Cook, stirring, for 1 minute, or until meat is coated with paste. Add tomato paste and stock. Bring to a boil. Reduce heat to low. Cover. Cook for 1 hour, or until beef is tender.
4. Remove lid. Cook, uncovered, for a ca 15 minutes, or until sauce has reduced and thickened slightly.
3-5 dried red chilies (more or less per your desired hotness)
1/2 teaspoon fennel seeds
2 tablespoons olive oil
2 tablespoons ghee butter
1 bunch or fresh parsley or coriander (I prefer coriander, but sometimes it is not available)
2 really large white onions (or 3-5 or so small/medium ones)
8-10 tablespoons Gram (chickpea) flour (the amount will depend on how much of the other ingredients you have used)
2-3 tablespoons water
Directions:
1. Prepare the paste - using the same process as above - roast seeds, grind then and make a paste in food processor, adding the olive oil.
2. Slice onions and mix with the chopped parsley (or coriander).
3. Our secret to great Bhaji is to sautee the onions (most recipes do not call for this). You will need to do this until the onions are nice and soft. About halfway through this process, add the paste to the onions.
4. When onions are nice and soft - remove from stove and let cool or place in the fridge to cool down.
5. Add Gram (chickpea) flour and water and mix thoroughly. You do not want a really sticky consistency, but you also do not want a completely "battered" consistency. Once again, put the mixture in the fridge when it is finished. It is easier to form and work with it when it is a bit cooler.
6. Heat some oil (we use the same oil over and over) and then fry the onion bhaji.
I made muffins for a friend for her birthday - she wanted something other than cupcakes- so she had the idea of something with bananas and we ended up with this idea. I did only this batch (no test batch) and they turned out AWESOME!!
The recipe itself I adapted from The Gluten Free Goddess' Blog. I change a few of the amounts (especially in the xanthan gum as I normally leave it out completely unless doing bread - and muffins are more of a bread than cake, so left it in, but cut it way way back) and used what was available in Germany as well as a slight temperature change.
Preheat your oven to 180°C. Line muffin pan with paper liners
1 cup Ripe Bananas - mashed
1/4 cup Mazola Oil
1 cup Light Brown Sugar (American style brown sugar, not UK or EU, although the others would work, just slightly different texture)
2 teaspoons GF Vanilla Extract
2 Eggs
120 grams Millet Flour
96 grams Potato Starch
1 teaspoon Baking Soda
1 teaspoon Baking Powder
1/4 teaspoon Salt
1/2 teaspoons xanthan gum
1 1/2 teaspoons cinnamon
1/2 cup Walnuts - Chopped (for the muffin mix)
1/2 cup Walnuts - left in halves (for decoration on top)
Mix the bananas, oil, brown sugar, vanilla and eggs in your stand mixer until well blended.
In a separate bowl, shift together the remaining dry ingredients (except for the ½ cup of walnuts that are still halves). Once sifted together well, add to the mixture in your stand mixer and mix for 1-2 minutes until smooth.
Fill the muffin liners 2/3 full and place 1 or 2 of the halves of walnuts on top.
Bake for 20 minutes (+/- depending on your oven).
Remove and let cool in muffin pan for 10 minutes and then place on wire rack to completely cool.
So, I had these football paper cup liners that my mom brought me last time she was here visiting from the states, and well, in Germany, there is only 1 day a year to use them :) So, I made some cupcakes to take the the pub tonight for the game. In Munich, kick-off is at 00:30 - just after midnight! So, I decided to make the cupcakes espresso to keep us awake. And what better way to top them but with some Amaretto Butter Cream. I then decorated half of them as the yard markers and the other half - half Green Bay colors and half Pittsburgh colors!
1 cup Soy Milk (I did use soy here, even though I've an allergy-I was out of rice milk & the cupcakes were for my friends, not me :)
Espresso Instant Powder - to equal 6 cups of espresso (I used individual packets, so used 6)
1/3 cup Mazola oil
3/4 cup Moscovado Sugar
2 teaspoons GF Vanilla Extract
1/4 teaspoon Almond Extract
Mix above in stand mixer on speed 2 until well blended. Then add
1/4 cup Tapioca Starch
2 tablespoons Flaxseed (ground/flour)
Mix for 1-2 minute on speed 2-3 or until it is thoroughly mixed.
Then sift together in a bowl the following ingredients
1/3 cup Dutch Cocoa Powder
1/2 cup White Rice Flour
1/2 cup Quinoa Flour
1/4 cup Millet or Sorghum flour (I find the books recipe to work MUCH better with some added flour, and a different type too)
1 teaspoon GF Baking Powder
1/2 teaspoon Baking Soda
1/4 teaspoon Salt
Add this sifted ingredient to the mixture. This is where I differ from the book. It states "don't worry about over-mixing..." I strongly disagree with this. The LESS you mix, the better the gluten free cakes raise!!! Over-mixing will ruin what ever is left in the mixture that allows it to raise. So, only mix for a minute or 2 on low speed (2) until well mixed!!!!
Fill cupcake liners 2/3 full and bake at 180°C (350°F) for 21 min. Cool 10 min before removing from the pan and placing on wire rack to completely cool.
For the Frosting:
55 grams Crisco
55 grams Gluten and Milk Free Margarine
Mix these for about 30 seconds to a minute on speed 2 of your stand mixer
Then add
375 grams powdered sugar
Mix for 2 minutes or so (If it is too dry, add a bit of the Amaretto, but just a bit, you want to mix this well before adding the rest of the liquid).
Now add the rest of the liquid
1/8 cup Amaretto (more or less to get the consistency you want)
Mix in stand mixer for 5-7 minutes or so - this will make it nice and fluffy and light and will not taste so sweet :)
For the grass, I used Wilton tip 233 and Wilton Kelly Green gel coloring. For the yellow, I used Wilton Golden Yellow. I used green sugar glitter and black sugar glitter to top the yellow with to make the different team colors.
Have fun!
EDIT:
Here is a pic from my mobile. I dont have a flash, so it did not turn out too great, but you get the idea :) They were a hit!
These were made for the book club (one of the members is gluten, milk and egg intolerant). I have made cupcakes without the eggs several times before, but they always sank in the middle (I used my standard chocolate cupcake recipe and substituted flaxseed/water mixture for the egg). This time I had such a great success with the recipe that I altered from Vegan Cupcakes Take over the World, that I used it again for this batch. You can find the recipe in the post with the Super Bowl cupcakes
To make them look like a cappuccino, I used the same frosting as in the Super Bowl cupcakes, only not adding coloring of course, as well as a bit more Amaretto and then topping with cocoa powder and a chocolate covered espresso bean.
I know have been lacking in post lately, I will catch up eventually, but here is a pic of my birthday cupcakes - 40 in total ;-)
BTW, the bowl and the trivet were souvenirs bought at the Grand Bazaar in Istanbul specifically for these cupcakes :)
And here are the back up cupcakes :)
And a pic from the party - most turned out not in focus, so this is the best one I had!
OK, so finally time to catch up with some blogging. So, I turned 40 a week ago - it was hard, very hard - let me tell you! I am not ready for this age at all, but am finally coming to grips with it :)
I saw a picture of what I thought was the perfect cupcake about 6 months ago. I fell in love with it the moment I saw it (it was one of those little ads on the sidebar on facebook). It was a chocolate cupcakes in a brown paper liner and frosted with the most gorgeous turquoise color (one of my favorite colors!!!). I was determined to make these for my 40th. Problem is, in Germany, it is extremely difficult (and expensive when you do find a way) to get proper cupcakes decorating stuff - the Germans just do not decorate at all like we do! So, I had a friend bring me over the proper Wilton food gel colors that I need and another one bring over the brown liners - so it was a joint effort for these cupcakes. Then I needed something to take a picture of them on that made them super special to me. For my 40th, my lovely Guy and I went to Istanbul for 5 days - it was AMAZING!!! And on my birthday itself, we walked for hours in the Grand Bazaar and we found the perfect items for my cupcakes. A lovely turquoise/black trivet and bowl.
I also wanted to have a 2nd type of cupcake as well for my party (we celebrated here with friends the following Sat after my birthday) as I wanted to have 40 cupcakes. So, I made the same recipe - but used some other quite cool cupcake liners that a friend sent me and a cocoa butter cream for those. All the pics are above.
Here is the recipe I used, which is my basic one I have used for the last few batches, but a few changes. One major change is I can no longer use soy milk (have intolerance to that now too :(
Chocolate cupcakes
Makes 16 cupcakes
Ingredients:
20 g Quinoa Flour
40 g Millet or Sorghum Flour
40 g Amaranth Flour
20 g Rice Flour
15 g Tapioca Flour
2 tsp GF Baking Powder65 g Dutch Cocoa Powder
1/4 tsp salt
40 g Milk Free Margarine softened
150 g Muscovado Sugar
2 eggs
1 tsp GF Pure Vanilla Extract
1/2 cup Sheep’s Plain Yogurt
1/2 cup Rice Milk
Directions
Preheat oven to 180°C
Line cupcake pan with liners
Mix all dry ingredients and sift together several times.
Mix all wet ingredients until smooth.
Add the dry ingredients to the wet ingredients and mix until smooth and thoroughly mixed.
Bake at 180°C for 20min. Allow to cool 10 min in pan and then remove and place on wire rack to completely cool before frosting.
I used the same wilton butter cream frosting I always use, with Wilton food coloring gels. A mixture of Sky Blue and Lemon Yellow (adjusting back and forth until I got the perfect Turquoise)
I have been on a little "no net" holiday as I just turned 40 and it was not so easy crossing this border in life. We had a wonderful little holiday in Istanbul and some down time here in Munich. But, I am back and starting baking tonight. I have a huge batch of birthday cupcakes to make for my party on Saturday and some super bowl cupcakes for Sunday. Will be a busy baker.
Will update and post more this weekend, early next week,